Showing posts with label Glossy Accents. Show all posts

Thursday, March 12, 2015

30 Day Coloring Challenge - Day 9

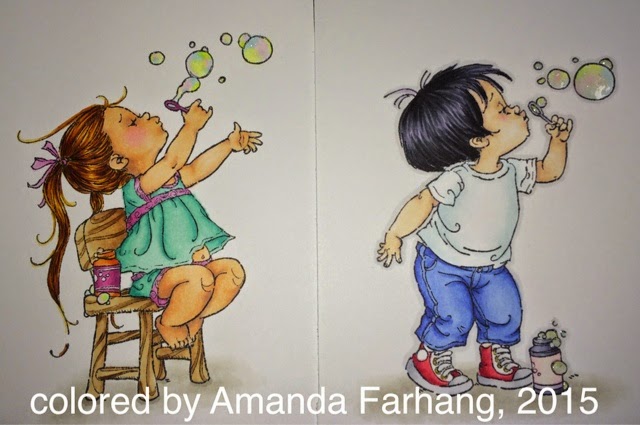
Here's my submission for Day 9 of #thedailymarker30day challenge!  Woo! SO Super excited about today's coloring adventure! 
 
I've had these stamps in my collection for over a year now, and I haven't really had an opportunity to spend much time with them, until now! I think they are from Penny Black (Mo Manning), but I'm not 100% sure.... let me know in the comments if you can confirm.... Anyway, to whoever designed these, I love them. They were a blast to color! 
 
These images were stamped on Neenah Exact Index 110 lb card stock, in Tuxedo Black Memento Ink and colored with copics.  I put a little wink of stella on the bubbles and glossy accents on the bubbles in the Boy picture.  I wasn't sure if I wanted to add glossy accents to the bubbles in the girl picture, so I am going to wait on that until I'm ready to put this image on a card. 
 
The bubbles are my favorite part... I took 4 or 5 of the super bright/light copic colors (BV000, B000, RV00, YG1, Y00) and scribbled a little blob of color inside the bubbles. Then, I took my colorless blender (0) and scribbled over the bubble (but inside the lines) until there were no crisp edges between the different colors.  Then, I covered the bubbles with Wink of Stella.  They look FAB. 
 
I colored the boy image first, and then the girl image.  Looking at them now, I see that my girl picture has a jaw line, and my boy picture has a flat neck....  eh, just goes to show me that I need to practice more.  I'll leave this image as it is, and try to provide more contours to the face and neck area on the next "people" stamp I color in.   


I never get tired of the comments from @kathyrac or the other wonderful crafters on Instagram.  Everyone is so awesome.    and hey.... it looks like one of my coworkers liked my coloring too.  


later.
xoxo,
Amanda

Monday, October 21, 2013

Makin' Rain

Raindrops on Roses and Whiskers on Kittens...

I saw this technique on YouTube several months ago and I figured I would give it a try. Worked like a charm!

Materials:
Glossy Accents (any brand is probably fine, I use this one from Ranger)
Blue Re-Inker (any brand and color is probably fine, I used Not Quite Navy from Stampin' Up)
Non-Stick Craft Sheet (I use this one from Ranger)
Mixing Container
Toothpick

Directions:
1. Find something to mix your materials in.  I used a shot glass, but a Dixie cup or a clean soda bottle cap would probably work fine too.

2. Squeeze a blob of Glossy Accents into your mixing container - I used a blob about the size of a nickle.

3. Mix in one drop of the blue re-inker at a time, and mix with the glossy accents with the toothpick. A little bit of ink goes a looong way.  But you can totally adjust the color to your preference.  If you want the color a little bit darker: add another drop of the re-inker and mix until the Glossy Accents has no more streaks in it. If it's too dark: add more Glossy Accents to it... just make sure your mixture is evenly mixed before your start making your drops.

4. Make sure your non-stick craft sheet is clean and flat.  If you do not have a non-stick craft sheet you can probably use a sheet of wax paper. 

5. Using the toothpick, pick up a drop of the colored Glossy Accents.  Place the drop of Glossy Accents on the non-stick sheet.  Then, with the tip of the toothpick, gently drag a bit of the Glossy Accents in one direction to achieve the teardrop shape.  You may need to pick up more Glossy Accents from your mixing container to fill in the shape. 

6. Leave to dry for at least 30 minutes.  If your drops are small, it shouldn't take them too long to air dry.  Since I am a worry wart, I left mine to air dry for about an hour.  Do not use your heat gun to dry your drops, they will bubble and it ruins the smooth finish. :(


Storage:
I made a bunch of these drops to use on a current project, and then stored the rest in an empty clear mount stamp case from Stampin' Up.  I used my paper piercer to gently remove the dried drops from my non-stick craft sheet and I put a tiny dot of glue on the back of each drop before I stuck it to the empty case.  Now I can pull out my pre-made, hand-made embellishments when I need them for a future card! I just use my paper piercer to pick up the drops and add more glue before I add them to my cards. 


Ideas:
I used these drops as rain, but you can also use them as tears, splash drops, drips from faucets, dew drops on flowers... etc. 

Instead of blue ink, you can use red ink to make blood droplets for Halloween cards!  HA! Genius!

Popular Posts